APPLE CRUMBLE SUNDAES

Wednesday, 27 April 2016

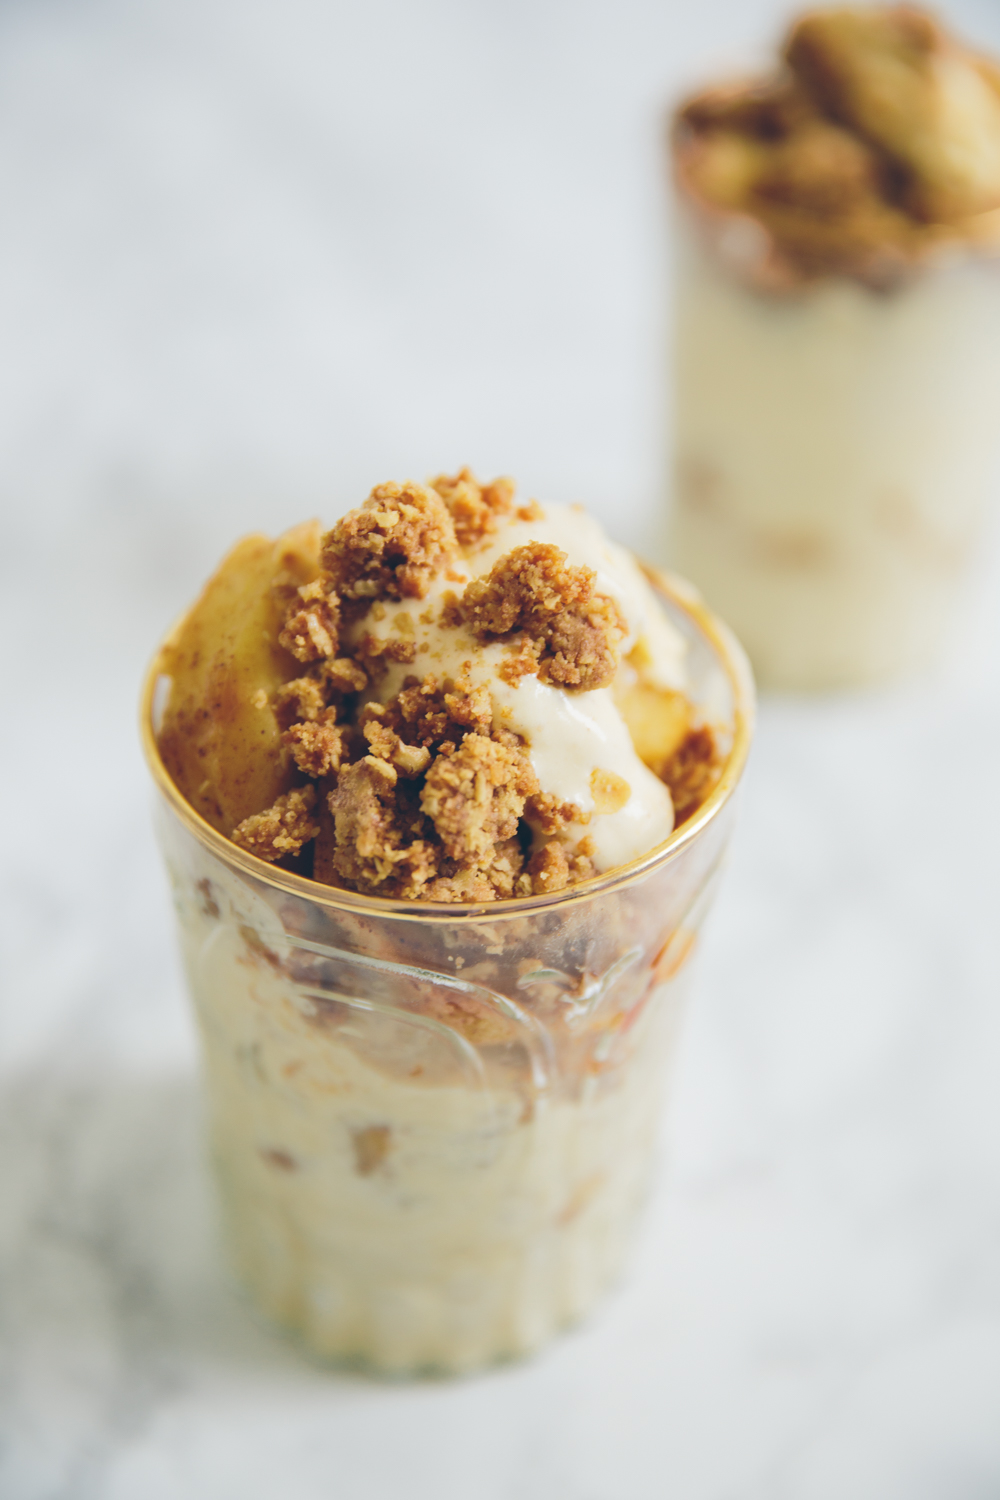
These apple crumble sundaes are the second recipe that I shot with Jo (the first was these pesto breakfast pizzas!) and I love the way the photos turned out.

This recipe is inspired by an apple pie sundae I had at Soho House and I knew these pretty glasses from H&M Home would be perfect for the decadent layers of vanilla ice cream, spiced apples and crumbly, crunchy topping - which is taken from this recipe.


For the crumble
110g plain flour
A pinch of fine sea salt
100g cold, unsalted butter, cut into cubes
75g granulated or demerara sugar
50g medium oatmeal, ground almonds or porridge oats


For the apples
5 - 6 medium-sized apples - I used Braeburn
1tsp ground cinnamon
1tsp ground nutmeg
50g butter
Half a lemon
1tbsp honey
1tbsp demerara sugar

Vanilla ice cream to serve

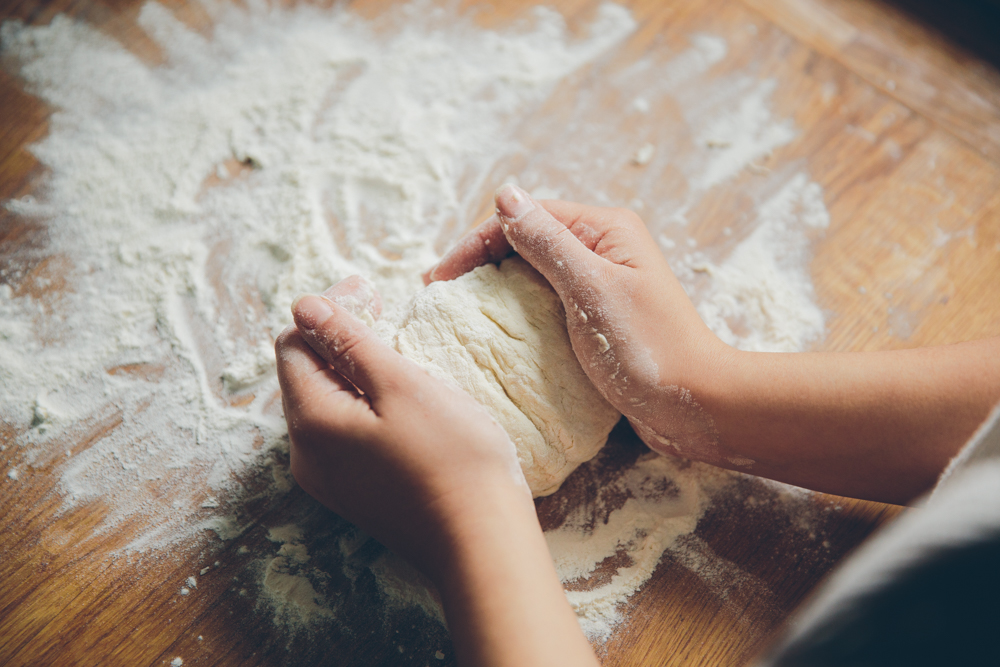
For the crumble, which you can make ahead, preheat the oven to 180C/Gas 4. Put all the ingredients in a large bowl and rub together with your fingertips until you have a crumbly dough. Squeeze the mixture to form clumps, then crumble on to a large baking tray and spread evenly. Bake for 25 minutes, stirring halfway, until golden and crisp. Cool and keep in an airtight container until ready to use.

Meanwhile, peel and core the apples and cut them into quarters or sixths. Arrange in a baking tray and sprinkle over the ingredients so that the apples are evenly coated. Bake in the oven for 25 minutes, or until apples are soft to your liking.

To serve, simply layer the ice cream, apples and crumble topping and enjoy straight away. The topping will keep in an airtight container for a week or so and is delicious sprinkled over yoghurt and fruit. 

MEET BAKI

Friday, 22 April 2016

Introducing the reason why I haven't blogged in ages! It's been a week since we picked up our puppy and life hasn't stopped, even for a minute, since.

First things first, his name is Baki - named after Darren's favourite Japanese manga character. We might have shot ourselves in the foot a bit as Baki is a wrestler and this boisterous little pup is certainly living up to his name! He's a Staffordshire Bull Terrier x Labrador cross - our two favourite dogs! We've been wanting a dog for years and decided that it's never going to be 'the right time'. The first night we got him we were a bit shellshocked - he has SO much energy - but we've settled into the swing of things. We've been getting up in the night with him to make sure he goes to the toilet in the right place and not in his bed...I'm not expecting to have a lie in now for at least a few months!

He chews absolutely everything so we had to do some serious puppy proofing after he arrived; there is literally nothing on the floor anymore as he wants to play with all of the things! Apart from a bit of nipping, he is a total babe and when he curls up in your lap to sleep...well there's just nothing better.


PESTO BREAKFAST PIZZAS

Tuesday, 12 April 2016

My lovely friend Jo (who's shooting our wedding!) came over a few weeks ago for a cooking and photographing day; I can't tell you how nice it was to have someone snapping along while I cooked, so I didn't have to stop to take pictures. And of course the photos are gorgeous! Scroll to the bottom - it's hard to choose between pictures when they're all awesome - for the recipe and some tips on how to get the perfect runny yolk.


Ingredients for 2
2 flatbread pizza bases (recipe here)
A few tablespoons pesto (the homemade stuff is best - recipe here)
100g smoked lardons
2 eggs

Pre-heat the grill.

Make the bases using my flatbread recipe linked above. Make the pesto - also linked above. Fry the lardons until crisp. Separate the yolk and white of each egg - it's easiest to do this using a small bowl or ramekin to put the white into, and leave the yolk in one half of the shell, keeping it upright in an egg cup. Spread a tablespoon of pesto over the base and sprinkle half of the lardons over it. Pour the egg white onto the pizza and pop under the grill for a few minutes, until the white is nearly set. Take the pizzas out of the oven and pour the yolk into the centre of the whites - return to the grill for a few more minutes until the yolk is set to your liking.

This may seem like a bit of a faff, but after a little experimentation, I found that this is the best way to make sure the yolk stays runny, which is VITAL (in my humble opinion). One recipe I'd seen suggested baking the pizza (with both white and yolk added at the same time) - but the result was a strangely marbled, hardened yolk and a barely-cooked white, which you can see in my instagram snap here; still tasty though!

Thanks for the photos, Jo! Please can you come be my live-in photographer?

FINDING CONFIDENCE IN YOUR COOKING

Friday, 1 April 2016


Cooking for other people can be a daunting prospect. For many people, food is their love language and cooking for friends and family is such an intrinsic part of who they are. For me, that natural confidence is often missing; having people over for dinner makes me anxious. What should I cook? Will they like it? What if they don't!? I love to cook and I'm sure the fact that I've cooked on telly for one of Britain's most famous chefs should point to the fact that I'm confident about my cooking, but the truth of the matter is - far from it! 

Of course, there are compliments from friends, but most dinner guests (at least, the ones I like to have around my table!) are mostly likely to tell you it's delicious, even if it's only moderately so. Sometimes I have quite weird tastes...I love certain things together that shouldn't go together and I'm indiscriminate in my love of hotdog frankfurters and cheap greasy spoon sausages. Sorry, not sorry! So for that reason, it can be hard to tell if something I've made is good...or I just think it is! Having an honest boyfriend (whom I cook for most nights) definitely solves some of the mystery, but he can be brutally honest - for example, he didn't like the Vietnamese salad dish I made on Humble Pie!

I'm currently re-reading Cooking For Mr Latte, in which she makes the case for a signature menu. Like me, the author loves cooking; so much so, that she rarely cooks the same dish more than a few times, choosing to flit between newly-discovered techniques and ingredients. But, she notes, hosting a dinner party sends her into a spiral of panic, whereas having a tried-and-tested set of dishes ready to go takes the anxiety out of preparing food for others and leaves you open for being a relaxed, attentive host. I think that will have to be my next project – starting with making the perfect meatballs: I always come back to this article, about how having people over doesn’t need to be a ‘special occasion’ where you put on your best show. Really, it’s just about bringing people together. Amen!

So I'm curious; what gives you confidence in your cooking? Does cooking come naturally to you? Do you have a signature dish that does the job for dinner parties, leaving you free to be the perfect host? Any kitchen disasters that knocked your confidence? 


Recipes from top to bottom: Mini lemon and blackberry cakes, Breakfast burritos w/ homemade tortillas, Double-wrapped spring rolls (as part of this dish), Bombay omelette inspired by Dishoom, Chipotle macaroni cheese, Homemade furikake rice bowls, Courgetti and halloumi.

BROCCOLI PESTO

Tuesday, 29 March 2016

I got up 10 minutes earlier than usual to take these photos so I could squeeze them on the blog this week; dedication or what!? I quite like the shadows cast by the early morning light, though. This meal does what it says on the tin: it's pesto, made with broccoli. It takes about 15 minutes to knock up and it's equal parts hearty and comforting, yet light. It's pretty cheap too!

Ingredients to serve 4
1 head of broccoli
3 cloves garlic (or more, if you like - I do!)
50g parmesan or gran padano cheese, grated
Handful of basil leaves
50g pine nuts, toasted
Lemon
Olive oil
Salt and peper to taste
500g shell pasta

Tear or cut the broccoli into florets and discard the thick stem. Bring a large pot of water to the boil and cook the broccoli for about 5 minutes, until just cooked. Remove the broccoli with a slotted spoon and reserved the water for cooking the pasta. In a separate pan, toast the pine nuts until golden.

In a food processor, blend the garlic, pine nuts, a big handful of cheese, the juice of half a lemon and the broccoli, along with a generous glug of olive oil. Keep adding olive oil until you reach your desired consistency; if you want a looser mixture, but feel like you've already added enough olive oil, you can add a tablespoon of the cooking water from the broccoli/pasta. Add salt and pepper to taste.

Meanwhile, bring the pot of water back to the boil, tip in the pasta and cook for 10 to 12 minutes, or until al dente. Mix everything together and serve with grated parmesan and a few torn up basil leaves.

The pasta keeps well in the fridge for a few days and is just as tasty cold as it is hot.

p.s. what do you think of these less picture-heavy posts? I actually prefer it for recipes, so there's less scrolling. Plus, it's a lot quicker too! 

101 USES FOR TINY JARS

Thursday, 24 March 2016


I am a container hoarder of epic proportions. Pickle jars, tupperware, glass bottles all get recycled in this house for all manner of things. The most perfect little vessels I've found are those that belong to the Glenilen Farm yoghurts. Apart from the fact these yoghurts are a bit dreamy, they're not any more expensive than your average individual yoghurt pot and you get the little glass jars to keep. I cleared out my desk at work and found more jars than I care to explain lurking in my drawers, so here are a few recycling ideas, should you find yourself in the same predicament.


From top to bottom: Bud jars for tiny flowers, jars for salts and spices - this is my homemade furikake - transportable chia pudding pots for breakfast at work, tea light holders, make-up holders. Not quite 101 ideas, but you get the gist. Any tricks I'm missing?

COMFORT FOOD: bbq bean chilli

Monday, 21 March 2016


Sometimes you want to be warmed from the inside out and only a big ol' plate of beans will do (I can see a pattern here!). The great thing about beans is that a little goes a long way; they're cheap to make and they fill you up fast and keep you fuller for longer, and even diehard meat lovers can admit to the fact that this dish is no poorer for not having meat in it.

Makes a large pot for 2, with leftovers

Ingredients
Olive oil
2tsp smokey paprika
2tsp cinnamon
2tsp cayenne pepper
Coriander stems, finely sliced
2 cloves of garlic, chopped
1 onion, finely diced
2 peppers, sliced into strips
2 x 400g cans of beans - I used kidney and haricot beans, but any you like will do
2 large handfuls of mushrooms (don't like mushrooms? Add another can of beans)
1 x 400g can chopped tomatoes
Stock cube (optional)
Salt and pepper to taste
2tbsp barbecue sauce - I used Jack Daniels'
Sour cream, coriander and tortilla chips to serve

Heat the oil in a large saucepan with the spices and coriander stems. Add the onions and garlic and soften for about 5 minutes until the onions are translucent. Add the peppers and mushrooms and fry for 5 minutes until just cooked. Add the beans and tomatoes, stir to combine and add the stock cube (if using), plus half a can of boiling water. Bring to the boil, add the barbecue sauce, lower the heat and simmer, covered for about 20 minutes. If it's too watery, remove the lid and simmer for a further 10 minutes until thickened.

Serve with a big dollop of sour cream, a handful of coriander and some tortilla chips - if you want to make this a little more indulgent, spread the tortilla chips on a baking tray, sprinkle with cheese and jalapeños and grill for 5 minutes for a tasty plate of nachos to share.

MOROCCAN LAMB FLATBREAD PIZZA

Friday, 12 February 2016

If someone had told me almost a year ago when we started making our own tortillas that they could be easily adapted into pizza bases, I'm sure I would be the size of a house by now! Thanks to the fact that this recipe calls for harissa paste instead of tomato sauce for a punchy Moroccan kick and the bases take mere minutes to knock up, you can have this pizza ready in about half an hour - much quicker (and healthier) than a takeaway!

Topped with sweet, crispy lamb, hot pickled peppers and melted feta, these bad boys are now firmly part of our weekly rotation.


Makes two 8-inch personal pizzas

For the flatbreads
200g self-raising flour
1tsp baking powder
Pinch of salt
150ml warm water
1 ½tbsp olive oil

For the toppings
200g Scotch lamb mince
½ green pepper, finely diced
½ small onion, finely diced
1tsp ras el hanout
1tsp cinnamon
½tsp paprika
½tsp garlic granules
1tbsp honey
1tbsp olive oil
2tbsp harissa paste
75g feta cheese
75g grated mozzarella or cheddar 
3 pickled chilli peppers
1 tomato, roughly chopped

To make the flatbreads, combine all of the ingredients together. Gently mix with a wooden spoon until it becomes a soft dough. Turn out onto a floured surface and knead for a few minutes. Cut the dough in half and roll out into 8-inch rounds, about the same thickness as a pitta bread. In a hot, non-stick pan, cook on each side for a minute, or until bubbles start to appear. Set aside.


In the same pan, heat a tablespoon of olive oil along with the ras el hanout, cinnamon, paprika and garlic granules. Once the spices start to release their aroma, add the onion and Scotch lamb mince to the frying pan and brown, breaking up any lumps with a wooden spoon. Add the green onion and fry for a few minutes, until the lamb mince is cooked through. Carefully, using the spoon or a pan lid, drain away any oil in the pan. Return to the heat and add the honey; it should sizzle and the lamb will start to go lovely and crispy. 

Heat up the grill. Meanwhile, wipe the pan clean and place one of the flatbreads in it. Put a tablespoon of harissa paste in the centre and spread outwards using the back of the spoon until most of the base is covered. Just a thin layer will do; the paste is fairly strong and can be quite spicy! Top with half of the lamb mixture, crumbled feta, tomato, grated cheese and sliced pickled peppers. Pop under the grill for about 10 minutes, or until the cheese is melted and starting to bubble. Repeat with the second flatbread, slice and enjoy!