Showing posts with label frugal recipes. Show all posts

GARLIC BUTTER PASTA

Sunday, 3 July 2016

While not groundbreaking, I have sincerely been eating this on regular rotation in recent weeks and in the spirit of sharing the (carb)load, I thought this easy recipe was worth a bit of time in the blog limelight. When I was in kindergarten I had a Swedish Vietnamese friend who's mum made spaghetti with butter and yes, it is as delicious as it sounds. This version is slightly more sophisticated, but it's the addition of a splash of pasta water that gives it silky smooth, restaurant-quality appeal. Plus, cooking time is just however long you like to cook your pasta!

Originally we were making this a few nights a ewek as we couldn't let Baki out of our sight for more than a few seconds for fear of a wee on the carpet or a dalliance on the sofa, and it was the easiest thing to whip up in a squeeze - plus, when your dog wakes you up at 5am, it's pretty hard to think of an exciting meal to make come 7pm. However, now we've found that he loves to watch us cook and will sit nicely for up to 40 minutes, willing any scraps to fall from the chopping board, so hopefully that means more recipes in Sprunting!'s future.

Serves one
At least 75g spaghetti
1tbsp butter
1tbsp olive oil
1 - 2 cloves of garlic, finely sliced or minced
Coarse sea salt
Freshly ground pepper

Bring a pot of water to the boil with a big pinch of salt and add the spaghetti. Cook until al dente or to your liking - usually less than 10 minutes.

Meanwhile, heat the olive oil in a frying pan on a very low heat and add the garlic. Stir occasionally and don't allow the garlic to burn, or it will get bitter. Just before draining the pasta, remove a small amount of the cooking water using a mug - about 50ml is enough for one person - and add this to the pan with the garlic. Drain the pasta, stir through the butter and add to the frying pan. The water should have mostly evaporated/soaked into the pasta. Serve immediately with a generous helping of sea salt and ground pepper - parmesan cheese is a nice addition, but I prefer mine without.

BROCCOLI PESTO

Tuesday, 29 March 2016

I got up 10 minutes earlier than usual to take these photos so I could squeeze them on the blog this week; dedication or what!? I quite like the shadows cast by the early morning light, though. This meal does what it says on the tin: it's pesto, made with broccoli. It takes about 15 minutes to knock up and it's equal parts hearty and comforting, yet light. It's pretty cheap too!

Ingredients to serve 4
1 head of broccoli
3 cloves garlic (or more, if you like - I do!)
50g parmesan or gran padano cheese, grated
Handful of basil leaves
50g pine nuts, toasted
Lemon
Olive oil
Salt and peper to taste
500g shell pasta

Tear or cut the broccoli into florets and discard the thick stem. Bring a large pot of water to the boil and cook the broccoli for about 5 minutes, until just cooked. Remove the broccoli with a slotted spoon and reserved the water for cooking the pasta. In a separate pan, toast the pine nuts until golden.

In a food processor, blend the garlic, pine nuts, a big handful of cheese, the juice of half a lemon and the broccoli, along with a generous glug of olive oil. Keep adding olive oil until you reach your desired consistency; if you want a looser mixture, but feel like you've already added enough olive oil, you can add a tablespoon of the cooking water from the broccoli/pasta. Add salt and pepper to taste.

Meanwhile, bring the pot of water back to the boil, tip in the pasta and cook for 10 to 12 minutes, or until al dente. Mix everything together and serve with grated parmesan and a few torn up basil leaves.

The pasta keeps well in the fridge for a few days and is just as tasty cold as it is hot.

p.s. what do you think of these less picture-heavy posts? I actually prefer it for recipes, so there's less scrolling. Plus, it's a lot quicker too! 

COMFORT FOOD: bbq bean chilli

Monday, 21 March 2016


Sometimes you want to be warmed from the inside out and only a big ol' plate of beans will do (I can see a pattern here!). The great thing about beans is that a little goes a long way; they're cheap to make and they fill you up fast and keep you fuller for longer, and even diehard meat lovers can admit to the fact that this dish is no poorer for not having meat in it.

Makes a large pot for 2, with leftovers

Ingredients
Olive oil
2tsp smokey paprika
2tsp cinnamon
2tsp cayenne pepper
Coriander stems, finely sliced
2 cloves of garlic, chopped
1 onion, finely diced
2 peppers, sliced into strips
2 x 400g cans of beans - I used kidney and haricot beans, but any you like will do
2 large handfuls of mushrooms (don't like mushrooms? Add another can of beans)
1 x 400g can chopped tomatoes
Stock cube (optional)
Salt and pepper to taste
2tbsp barbecue sauce - I used Jack Daniels'
Sour cream, coriander and tortilla chips to serve

Heat the oil in a large saucepan with the spices and coriander stems. Add the onions and garlic and soften for about 5 minutes until the onions are translucent. Add the peppers and mushrooms and fry for 5 minutes until just cooked. Add the beans and tomatoes, stir to combine and add the stock cube (if using), plus half a can of boiling water. Bring to the boil, add the barbecue sauce, lower the heat and simmer, covered for about 20 minutes. If it's too watery, remove the lid and simmer for a further 10 minutes until thickened.

Serve with a big dollop of sour cream, a handful of coriander and some tortilla chips - if you want to make this a little more indulgent, spread the tortilla chips on a baking tray, sprinkle with cheese and jalapeños and grill for 5 minutes for a tasty plate of nachos to share.

VENISON SAUSAGES + BEANS

Wednesday, 25 November 2015


I feel like winter got off to a bit of a false start, but now it looks like it's properly here and we're hunkering down with hot chocolates, warming one-pot meals and too many layers. This recipe was on off-the-cuff weeknight supper; I was originally hoping to make a chorizo and potato version, but the supermarket didn't have cooking chorizo. I hadn't tried venison before, but these sausages are hearty and hold up well in a stew, plus they have much less fat than pork sausages. When I decided to make the recipe again for the blog this weekend, I couldn't quite remember exactly what I did the first time around, but it still turned out delicious and I'm quite confident that you could really go off-piste with this and it would still turn out well.


To make 2 - 3 portions
6 venison (or good quality pork) sausages
1 onion
2 cloves garlic
1 red pepper
2 400g tins plum tomatoes
1 400g tin haricot beans
Splash of white wine vinegar and balsamic vinegar
1tsp sugar
1tsp cumin
1tsp paprika
1tbsp tomato puree
1tbsp barbecue sauce (optional)
Salt and pepper

Pre-heat the oven to 170C. Meanwhile, finely dice the onion and fry in olive oil or butter in an ovenproof pan - if you don't have one, use a normal frying pan and transfer to an ovenproof pot before putting in the oven. Finely slice the garlic and dice the red pepper and add to the pan along with the white wine and balsamic vinegar.

Once the onions are translucent and slightly browned, push everything to the sides and add the sausages to the pan. Once browned, tip in the tinned tomatoes and beans. Bring everything to a gentle bubble and add the sugar, tomato puree, cumin, paprika and barbecue sauce (if using). Transfer to the oven and allow to cook for at least 30 minutes, or until the sauce has thickened and started to go a bit jam-like in places.

This easy one-pot meal is definitely satisfying enough as a standalone dish, but you could also serve it with a hunk of crusty bread to mop up the sauce or over a jacket potato (it is glorified baked beans, after all!).


CONVERTED TO COURGETTI

Monday, 16 November 2015

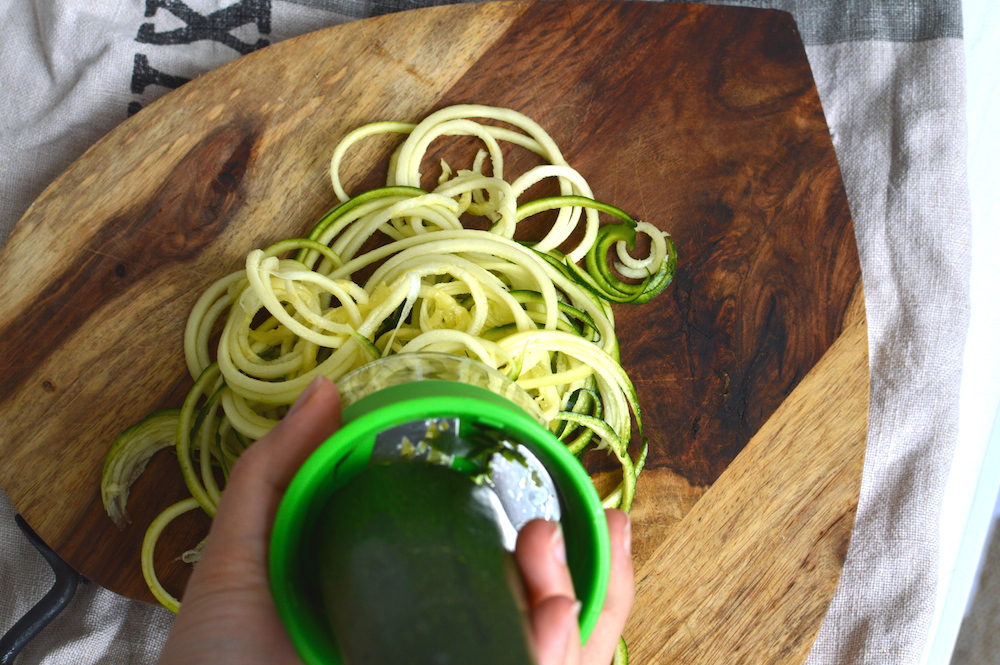
I refused to get into the whole 'courgetti' craze. IT'S NOT PASTA! But it turns out that if you actually use a spiralizer - I had been making strands using a julienne peeler - then it's still not pasta...but it's not disappointing either. My main bug bear with courgette noodles was that I just didn't want to invest in a spiralizer; they are clunky and expensive and for such a big gadget, they only do one thing. I recently discovered the OXO Good Grips Hand Held Spiralizer on Instagram and I ordered one straight away and I'm an instant convert!


This thing is small enough to pop away in the cutlery drawer, super-easy to use and you get the same exact results as with one of the larger versions. So really, this post isn't a recipe at all, but a big, lovey-dovey shoutout to my new favourite kitchen gadget. Courgettes are perfect as they hold their own in soups and sauces, but here I've simply served my courgetti with a squeeze of lime, plenty of fresh chilli and a thick slab of fried halloumi.


MEAL PLANNING TIPS

Wednesday, 22 July 2015
Do you plan your meals? I'm equal parts always thinking about my next meal and a total control freak so meal planning is something I've always tried to stick to and I've noticed how much more money and time I spend on weeknight meals when I haven't. It does require a bit of forward planning but it saves on both wasted food and money so I think it's really worth giving a go. I've put together a few of my meal planning tips that I hope will be helpful!


NAIL YOUR RECIPE REPERTOIRE
One of the most cost-effective and easy ways to plan meals is to think of a few go-to recipes that you eat in some kind of variation week in, week out. Having things you like to eat (and cook) to hand makes it easier to plan a few meals for the following week. You could keep a running list on your phone or stick one to the front of the fridge that you can add to. I like to write down things I think of during the week that I'd like to eat for the following week's food shop, which stops you just grabbing random ingredients that don't go together.

MAKE YOUR RECIPES WORK HARDER
Once you've thought of a few recipes you like to cook, try and think of other meals you can make with similar ingredients. Using the same key ingredients that you would use to make one meal last for two is a great way to save money and time. Here are a couple of ideas:

- Transform leftover spaghetti bolognese into chilli con carne with a few spices and a can of kidney beans
- Roast chicken on a Sunday becomes the base for chicken pie filling the next day
- A packet of mince can make beef burgers on night one and meatballs on night two

Read my post on using up leftovers for more ideas!


WRITE A LIST
By picking two or three meals and then following the above advice, you should have nearly enough meals to fill a full week. Don't forget to check your diary for any plans you've made so you don't end up buying food that you won't get around to eating. Write out all the ingredients for your meals and then add anything else you might need - milk, bread, cereal, eggs, etc. I think one of the things that puts people off shopping for the week is that last minute plans might crop up or you might end up working late and getting a takeaway instead, but you can always freeze meat or leftovers to use for another day.

GO ONLINE
One of the biggest things that has impacted the cost of our weekly shop is doing it online. You make a list, stick to it and hopefully aren't tempted by deals that aren't actually cost effective or extra ingredients and special treats (the treat aisle always gets me). There are plenty of supermarkets that offer cheap delivery slots and even if you have to pay £5, I bet you will still end up spending less. The other great thing about online food shopping is that you can see the total cost of your basket and if it's more than you thought it would be, you can go through the items and take out any that aren't essential. Since we've started getting our food delivered, we spend about £35 - £40 a week between us (including delivery) for a full week of meals with plenty of fresh vegetables and meat.


STOCKPILE
If you like the idea of planning meals but don't want to be restricted by a schedule, do a big order of staples - grains, pasta, tinned tomatoes, frozen vegetables and offers on meat. You can freeze the meat - or batch cook a few meals to freeze - and everything else will keep in the cupboards for ages. The Deliciously Ella cookbook is particularly good for rustling up meals from the cupboards as most of her recipes use store cupboard staples and don't require meat, dairy or most other items with a use-by date.

I know some of these tips might seem a bit obvious, but once you start meal planning, it really makes a big difference. Not only does it help cut down on food waste and save you money, but it saves so much time as well. Instead of deciding what you want to eat, then going to the supermarket after work (when you're hungry and will inevitably buy more than you need) and then coming home and finally starting to cook, you can get dinner on as soon as you get in the door. Having the whole process streamlined means I can often get home, cook and sit down to eat within thirty to forty minutes, which means more time for enjoying the rest of the evening.

#LOVEYOURLEFTOVERS

Monday, 22 June 2015

Leftovers are probably my favourite thing about cooking; I usually cook extra on purpose so that I can have leftovers the next day, and it's probably the best way of keeping our weekly food budget down. My favourite thing about leftovers is the way you can transform last night's dinner into something different to eat the next day, so you don't feel like you're munching on the same thing over and over again. Here are my favourite tips for loving your leftovers:

PUT AN EGG ON IT
In my opinion, everything tastes better with an egg on it. Whether boiled or fried, a lovely free range egg can turn a plate of leftover vegetables into a hearty hot supper. Likewise, putting your leftovers in an egg works well too - I love folding leftover chopped salsa into a spicy Bombay omelette.

MAKE SOUP
If you've made a curry or stew, add stock the next day to turn it into a soup. This works really well for Asian dishes and even last night's takeaway! Just add a little boiling water or stock and throw in a handful of rice noodles if you don't have any rice left. I like taking tupperware pots of curry to work and adding water before microwaving.

FEED AN ARMY
Always, always make extras. I find slow cooked sauces often taste better the next day when they've had a chance to infuse overnight. If you can't face eating the same packed lunch every day for a week, freeze into individual portions to be used in emergencies to stop you reaching for supermarket ready meals.

SWITCH IT UP
I think some people throw away extra food because they just don't want to eat the same thing two days in a row. If you don't fancy the idea of the same dinner two days running, think about how you can turn it on its head. Leftover roast chicken becomes fajitas, pie filling or stir fry fodder or you could try noodles or rice wrapped up in lettuce leaves with lots of lovely herbs and chilli sauce.

My go-to leftovers recipes: 
A frittata, of course, which tastes perfect hot or cold
Bon Appetit's chicken khao soi to take to work as a noodle pot the next day
My easy meatballs or Deliciously Ella's lentil bolognese to fill the freezer
Pulled pork, to be made into wraps, salads, sandwiches and more
The easiest pilau rice (definitely put an egg on it!)
Siobhan's butternut squash soup - super fresh with lots of lime
Jamie Oliver's veggie chilli with plenty of coriander and an avocado

FRITTATA REMIX: tomato + pesto

Friday, 22 May 2015
I'm running the risk of sounding a bit like a broken record, but this frittata was too pretty (and tasty!) not to share. Frittatas are my favourite quick and easy supper - this meal would have been on the table in about 15 minutes, had I not made the little roast potatoes. I posted my frittata recipe here before. This one just features halved cherry tomatoes and a healthy dollop of my homemade pesto rippled through it. I'm really enjoying the longer, lighter evenings - not only does it mean I can actually write recipe posts that aren't restricted by how much food I can fit into a weekend, but I ate this one out on the balcony in the last of the evening sun! Make sure to make extra so you can have leftovers for breakfast or as a packed lunch.

MINI QUESADILLAS

Monday, 30 March 2015

Now that I've got the hang of homemade flour tortillas, my trusty quesdillas have taken on a whole new level of awesome. I've blogged about them before, but since I've started making my own flour tortillas, they are even cheaper to make and still super tasty. They'd make great party snacks or packed lunches for little hands, plus the mini size means you can try out a bunch of different combinations without committing to one giant one.

What are your favourite quesadilla fillings? I recently tried putting avocado and small little gem lettuce leaves in them. Hot avocado and lettuce might seem slightly bizarre, but cooked lettuce is actually one of my favourite things - see three ways with little gem lettuce here - and it adds a surprising freshness and slight crunch. Try it for yourself!


COOKBOOK CHALLENGE: deliciously ella's lentil bolognese

Wednesday, 25 March 2015

I had this post saved for another day, but seeing as it's #meatfreeweek (missed the memo on that one when I posted those gyozas on Monday!), I thought I'd share this easy meat-free recipe.

I've been a big fan of the Deliciously Ella blog since its early days and I picked up the book recently on a bit of an Amazon spree. I've never been a fan of books which don't show a picture of every dish, but saying that, the lentil bolognese really stood out to me even though I had no idea what it would like.

At first I was sceptical because the recipe is SO simple and I was surprised at the short ingredient list and lack of herbs, but rest assured it is absolutely delicious; warming, hearty and somehow tastes like a real, meaty bolognese. My boyfriend went back for thirds and fourths, which is really saying something, as he loves his meat!


The ingredients measurements didn't quite match up for me, and I've heard from other people as well that her recipes make absolutely gigantic portions.

Ingredients for 4 (book)
3 large carrots
175g sun-dried tomatoes
3 cloves of garlic, peeled and crushed
2 x 400g tins chopped tomatoes
2 tubes of tomato puree (400g)
2 1/2 mugs green lentils (500g)
450ml boiling water
Salt and pepper

I intended to make half a batch, but I found that the water to lentil ratio didn't seem right as I was cooking, so the only thing I ended up halving was the lentils themselves. The idea of putting 2 whole tubes of tomato puree didn't seem right to me either, so below are the adjusted ingredients I used.

Ingredients for 4* (my adjustments)
2 large carrots
1/2 an onion
100g sun-dried tomatoes
3 cloves of garlic, peeled and crushed
2 x 400g tins chopped tomatoes
2 tablespoons tomato puree
250g dried green lentils (follow the packet instructions, but I didn't soak mine)
600ml boiling water
Salt and pepper

Start by peeling and grating the carrots using the coarse side of your grater. Chop the sun-dried tomatoes into small pieces and finely dice the onion.

Add the grated carrot, chopped sun-dried tomatoes, diced onion and crushed garlic to a large saucepan with the tins of chopped tomatoes, tomato puree, lentils and the boiling water.


Stir everything together and then allow the mixture to simmer for 45 minutes to an hour, stirring it every now and again as it cooks. If it looks too dry, add some more boiling water; if it looks too wet, turn the heat up for a bit to let some of the water boil away.

Ella serves the bolognese with gluten-free pasta, but I really like it with quinoa and a handful of spinach.


*Despite halving the lentils, I still ended up with loads. About 7 small portions, actually, when the quantities I used should have yielded about two or three. Because I was eating this for a light lunch, though, it's probably equivalent to about 4 servings. Luckily, the whole thing was absolutely delicious, as simple to make as it sounds and tasted wonderful, so I really didn't mind having it for lunch three days running or popping an extra batch in the freezer for a later date (it freezes beautifully!). I'm looking forward to trying some more of the recipes in the book, but I think I'll be reducing the measurements quite significantly next time!


FRUGAL RECIPES: homemade gyoza

Monday, 23 March 2015

Homemade gyozas might seem like a daunting feat, but they are so easy, not to mention insanely cheap and tasty too. It's quite easy to find pre-made dumpling wrappers in the frozen section of any Asian supermarket, but if you can't get your hand on them you can use this recipe to make your own.

To make around 70 dumplings (!!):
2 packets of dumpling wrappers (numbers might vary depending on the brand)
290g minced pork
1 tbsp each of soy sauce, sake/rice wine and sesame oil
Handful of spring onions
1 garlic clove
Small piece of fresh ginger
A few cabbage leaves
2 or 3 mushrooms

What you put in the filing is really up to you. Very finely chopped prawns are delicious, or you could replace the pork mince for turkey if you are particularly health-conscious. The vegetables are the same - you can add as many or as few as you like to bulk out your dumplings.

70 might seem like a lot, but I think we ate around 20 each and then froze the rest for a lazy evening meal (I'll explain how to freeze and cook from frozen at the end of the post).


Get your sous chef ;) to finely slice the vegetable you are using and mix them in a large bowl with the mince, along with a pinch of salt.


Here is the part which might seem daunting, but I promise it is so easy! You'll want to line up a little production line - it's handy to make these with another person, but not essential. You will need your bowl of filling, a teaspoon, a small cup of cold water and a tray or plate to lay out your finished dumplings.

Place a small teaspoon of filling in the centre of the dumpling wrapper, then dip your finger in the  water and trace around half of the rim of the paper. Fold the paper in half and gently press together the edges, making sure there aren't any air bubbles around the meat. You can create fancy pleats and ruffles, but you can also just keep them flat like mine.


Make sure you don't overfill the gyoza as  you don't want them to tear. If you have any filling leftover at the end, you could make them into meatballs and serve with rice and teriyaki sauce the following night.

To fry:
Heat up a good non-stick frying pan with a teaspoon of sunflower or sesame oil. When the pan is hot, place a few gyoza in the pan - make sure they aren't touching each other - and fry for 2-3 minutes or until the underside is golden brown (you can lift one up to check). Then pour in 100-200ml of water so that they cover the gyoza about halfway up. Pop a lid on the pan and cook for a further few minutes, until the water has evaporated.


A handy tip, which I realised after we did the first batch in the pictures above, is to press the gyoza down with your fingers to create a flat base. It's much easier to cook them this way and you'll get more browned surface area.


To steam:
I would only recommend this if you have a tiered bamboo steamer, otherwise you will be waiting ages for all of the batches to be cooked. Put a sheet of baking paper in the bottom of each tier and pierce a few holes to let the steam come through. Put a wok on medium heat with about an inch of boiling water. Put the bamboo steamer on top and allow to steam for 12-15 minutes.

To boil:
Place gyoza in a pot of boiling water - be careful not to overcrowd them - and cook for 5-6 minutes. Drain or remove with a slotted spoon.

To serve:
My favourite thing about this meal is that we usually allow ourselves to have just gyoza - no vegetables, no side dishes. You can serve them with any dipping sauce you like, but I like to combine soy sauce with vinegar for a tangy dip. Heaven!

To freeze/cook from frozen:
Lay the gyoza, not touching, on a baking sheet and put in the freezer for a few hours. Once frozen, you can pop them all in a tupperware or bag in the freezer and they won't stick to each other. To cook from frozen, follow the frying instructions. Don't defrost them though or they will get soggy!


Once you get the hang of it (this was only our second attempt!), it's really easy and an hour's labour will impress your friends and family and stock your freezer for another instant meal too. The ingredients for this batch of dumplings cost around £5 (the dumpling wrappers should be between £1-2), which is the same price as one serving that you might get at a restaurant.

More frugal recipes.

BREAKFAST BURRITOS w/ homemade tortillas

Wednesday, 11 March 2015


Breakfast burritos have become my unintentional signature dish. We eat them a lot and I didn't realise that I talk about them quite a lot too until a friend pointed out I'd mentioned them every time I'd seen her recently!

One of my early blog posts was a breakfast burrito bar for a cheap, end-of-the-month get together and my favoured ingredients are still pretty much the same, except now I make my own flour tortillas too!


This recipe is straight from BBC Good Food, a website I use A LOT, especially for the basics. Darren and I tried out a bunch of different recipes, but this is the one that works the best, so I wouldn't change a thing! To make these smaller tortillas, I halved the measurements on the website, which gave me 12 side plate-sized tortillas.

12 small tortillas:
200g self-raising flour
1/4 tsp salt
150ml warm water
1 1/2 tbsp olive oil

Mix the olive oil in with the water in a jug and then pour over the flour and salt. Gently mix with a spoon - it might seem like it's not going to come together in a dough, but it does. Once the dough is mostly combined, turn out onto a floured surface and knead for a few minutes until the dough is soft and elastic.


To get equal sized tortillas, the best thing to do is roll your dough out into a sausage shape, cut it in half and then cut each half in half and continue until you have 12 equally-sized balls. Generously flour your worktop and then squash a ball with your palm before rolling it out - this seems to be the best way to keep them round. Turning often while you are rolling also helps to keep the circular shape, though no one will ever say 'no thank you' to a slightly square tortilla, if that's what happens to yours.


Once you get the hang of it, it's really quite quick and there is something very satisfying in making your own, not to mention the fact that it probably costs less than 10p to make a big stack and you will almost always have the ingredients on hand.

You will need a really good non-stick pan which is piping hot and splashed with a little bit of sunflower oil. The tortilla should start to puff up a little bit, but your first few might not do this if the pan isn't hot enough. Have a look at the underside and when it's starting to get brown spots (a minute or 2), then flip and brown the other side.


Prep your fillings - I like a couple of leaves of gem lettuce, some halved cherry tomatoes, avocado, grated cheddar cheese, a fried egg and some sweetcorn. Plus lots of tabasco and coriander to serve. A little trick I like for the sweetcorn is to fry it in butter along with the egg and a few splashes of tabasco. It will get a slightly crisp, buttery edge and I'm all in favour of cooking everything in one pan.

These are lovely at any time of day and we've had them wrapped around spicy chicken with yoghurt sauce, as well as with our trusty pulled pork.


FRUGAL RECIPES: pea and courgette frittata

Wednesday, 25 February 2015

Have you made a frittata before? Anything with eggs in it already has me on board, but frittatas are SO quick and easy and tasty hot or cold, so they're a staple in my weekly rotation.

Ingredients for 4
6 large eggs
Half a courgette
Handful of peas
A few sprigs of mint
Salt and pepper to taste


First, turn on the grill.

Crack the eggs into a jug or bowl and whisk with a fork until the whites and yolks have combined. Season with salt and pepper.

Heat up a non-stick saucepan with a tablespoon of olive oil (or other cooking fat) and pour in the eggs. Gently sprinkle the vegetables over the top and cook for a few minutes.

Pop under the grill for a further five minutes, or until the top starts to puff up, and then you're ready to serve. If you don't have a grill, you can continue to cook it on the hob with a cover on the pan, or alternatively put it in the oven.


I really like the combination of spring greens and the mint makes it really fresh. Other combinations I love are:
Asparagus, pea and mint
Tomato and basil
Ham and cheese (classic!)

I actually prefer the frittata cool - it's a really good make-ahead recipe for brunch, picnics or packed lunch, and it always looks pretty. Once cooled, you can store in a tupperware for a few days in the fridge.

Cost per portion: about 40p